


Hello fellow bloggers. I've posted this tut over at the Tickled Pink Blog (hopefully it posts ok?) & I thought I'd post it here for you all too! I am here to show you how I made a coupla things on one of my {PINK} creations. This card landed me 4 top spots in various challenges.
I was sooooooooooo excited!
Goes to show what a great stamp & a little mojo can do together!
BE AWARE:
This is a photo filled post.
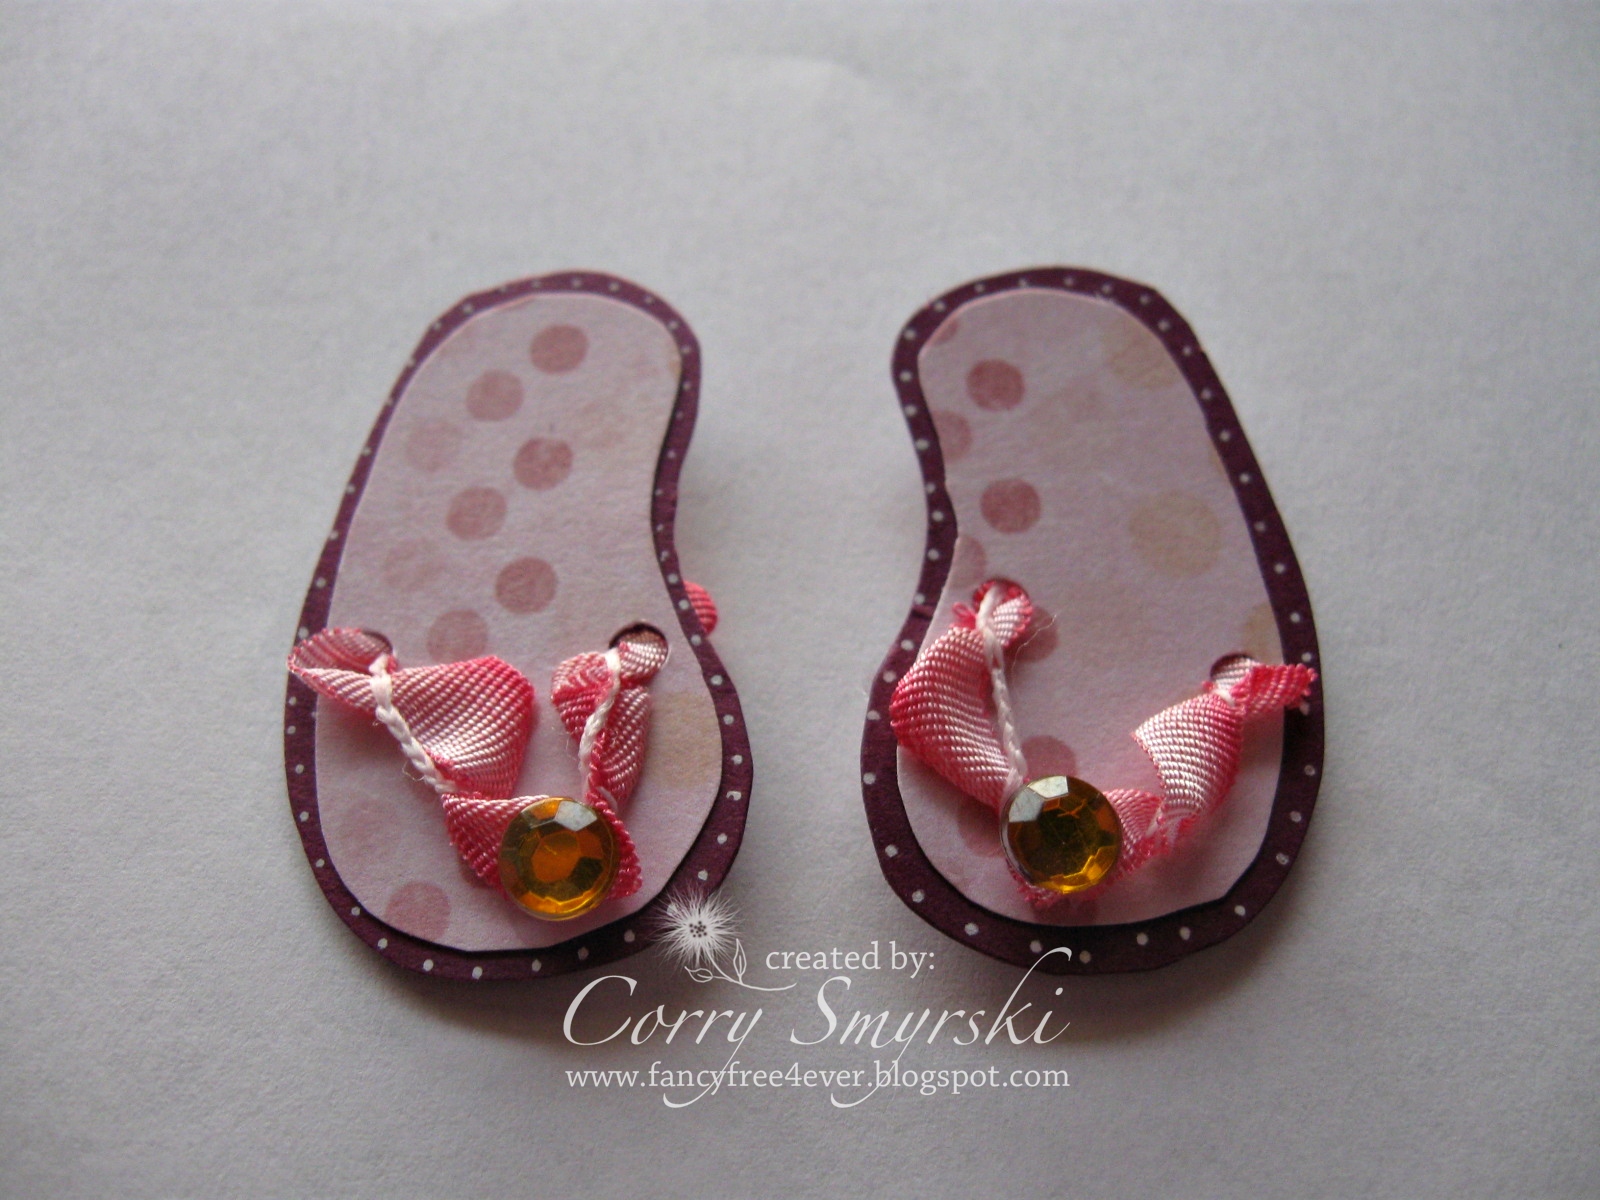
First things first, my sandals. I saw these on a card somewhere in blogland & thought they were so KEWL, so I simply had to give them a try.(forgive me I can't recall where I saw them initially but I am feverishly re-searching blogland every chance I get-UPDATE- I have seen more & more lately- these people are reading my mind! LOL )
These are the supplies you will need.
- 2 colors of paper (paper scraps are good for this)
-ribbon (1 long piece [4-6"] or 2 shorter pieces [2-3"] )
-crystal effects or glue dots
- tape/tape gun
-cropadile
-scissors
-6 eyelets
-pen
See the {sandal} shapes at the bottom of the pic....I freehanded those.....I started with the smaller one then realized that would not work very well, so I went for a larger size, measuring 2-3" in length.

Once I had my original 'freehanded' sandal shape, I then traced another one on the blue paper & then I flipped the paper (double sided DP- gotta love it) & traced two more sandal shapes on the green.


Since I wanted the blue to be my base, I cut the green DP a bit smaller than the blue (inside the trace lines) and adhered it to the blue like so (with my tape gun)


Then I took my handy dandy crop-a-dile and punched holes where the flip flop straps would attach to the bases.
TIP- remember to put one hole on top, nearer the inside of the flip flop template where one's great toe would be on the one side of the strap; while allowing lotsa room for the other toes on the other side of the strap
Then attach your eyelets accordingly.
Now, in the picture below you see I have 3 pieces of ribbon for the straps....I attemped to use the two smaller pieces but my eyelets would not allow for all the material to go thru it, so I opted for the one longer piece of ribbon. Still, my eyelet was not happy (as you can see in the following pic), and only allowed for a few strands of the material to come thru....so I made due with that.......


........and I crystal effected the little sucker down. I find crystal effects to be the most solid type of adhesive I own. Better than my hot glue gun & glue dots................not sure if it's better than Alleene's or not, but I tell ya, when I want something to stick & NEVER come off, I turn to my crystal effect bottle!

As I said above, the crystal effects can be substituted for a glue dot.....but it is not as strong, as you can tell by my other sandal below ..

HHmmmmmmm which one is adhered with crystal effects.
Now don't laugh at me with my completed sandals below. I know I said I wanted the blue to be my base, but I neglected to make the 'other foot template' LOL......so you get this.

I also made these in the meantime!!
Oh what fun, expecially for summer!
Notice I held off on the eyelets & I only used tape to hold the ribbon on the bottom of the sandal.
AND YES. ....one of each foot ! Yay, I got it right.
Challenges for my sandals below:
Really Reasonable Ribbons- keep it clean
Creative Craft Challenge- anything but a card
Less is More- things that move
**********************************************
Next I have my surfboard card.
Because the card I made ABOVE was for 'anything but square', I opted to make my own Surfboard; that is after googling it & seeing this super cute card HERE on Joanna's blog. I see that she used the Cutting Cafe template, but I figured....pffpptttp, how hard can it be!
Well, let me tell ya, it's a good thing I have a huge, gigantic stash o' scrap papers cuz i must have experimented with 12 different sheets before coming up with a decent shape! So , again bear with me.
The supplies you will need!
-scissors
-cutting mat
-big edge cutter
-oval shape (I am using my Creative Memories shaper & CM cutter[red thing])
-paper (9.5" X 12") depending on what size you want your surfboard to be

First I folded my paper in half .
Then I placed the oval cutting shape on the edge of the paper and used my cutter to cut from the folded end , up around the top curve, to halfway down the oval shape. Then (in the next pic) I took my half cut shape & placed it into my big edge cutter & cut from the bottom of my paper to where I stopped with my CM cutter.


Then from there, I simply shaped it to resemble a surfboard with my scissors.
In the end, my surfboard measus 8-9".
Easy Peasy, right!?!

TA-DA!
Hope you all have a Great Day!
Remeber the Tickled Pink Challenge is still going on- ANYTHING GOES
And
The Tickled Pink Monthly Christmas Challenge- EMBOSSING!


13 comments:
Awesome tutorial, I loved this card the first time I saw it! And those flip flops tdf!
great tut. you are really so clever, how fun isnt this. i too love to come up with al kinds of fun and silly things. sometimes it works out really well, but then sometimes...its a total mess,lol.
love those flippies!
hugs!
Oh my God, Cor! These are AMAZING! Sooo cool! Thanks for sharing!
Of course you won with that card...it's just gorgeous! Sooo many details...I wish my cards would look so good :)
Hugs,
Laura
wow this is fantastic cor.love the cool dude with his surfboard and those flipflops are just too cool :D
xx coops xx
Great cards... those flip flops are really clever!
Super job!
Thank you so much
Chrissie
"Less is More"
Love the slippahs (Hawaii lingo)...very cool! ;)
Super flip flops, very clever
Thanks so much
Diva LIM mandi
"Less is More"
Great idea.
Linbyx
Love the surfboard and flip flops, cool card. x
Love your flip-flops.
These are so so cute! Saw you on less is more...I'm a new follower!
Fab projects all - and I LOVE your flip flops!
Kathyk
Great project and tutorial! Thanks so much for participating in our Really Reasonable Ribbon challenge.
Post a Comment